As people are hunkered down at home to work and study in Singapore, the StarHub Internet service outage yesterday could not have come at a worst time.
One of its Domain Name Servers (DNS) had caused the disruption, which lasted hours and was only resolved yesterday evening, according to the telecom operator.
What’s a DNS, you may ask? Well, if the term seems familiar, it’s because a few years ago, another outage caused by a DNS problem resulted in widespread disruption for StarHub users as well.
Back in 2016, StarHub had issues with its infrastructure that resulted in DNS servers failing to connect users to their websites. Embarrassingly, it had initially thought it was hit by a cyber attack, only to be told that it had caused its own problem after investigations by government regulators.
Okay, so what’s a DNS again? Essentially, it directs your computer to the websites that you are looking to connect to.
Each computer on the Net has an unique IP address, in the form of a series of numbers. When you type in a Web address, say, Techgoondu.com, your computer is linked to the site by a DNS server that connects the numbers with the Web address.
Yes, rather like your phone’s contact list. So, when a DNS server is down, you can’t access your websites because your computer doesn’t know where to go to find them on the Net. That appears to be the problem with StarHub yesterday.
Typically, your Internet service provider is the one providing a DNS to your devices at home. However, you can – and should – point your PC or even your entire home network to a different DNS, one that is less prone to downtime and faster as well.
There are two important ones you can use – Google and CloudFlare.
Google has been providing a public DNS offering to users for free for more than a decade. You can simply go to your router or PC and change the DNS settings to 8.8.8.8 and/or 8.8.4.4.
The second free public DNS offering is from CloudFlare, an Internet company that helps customers fight off denial-of-service attacks through a distributed network.
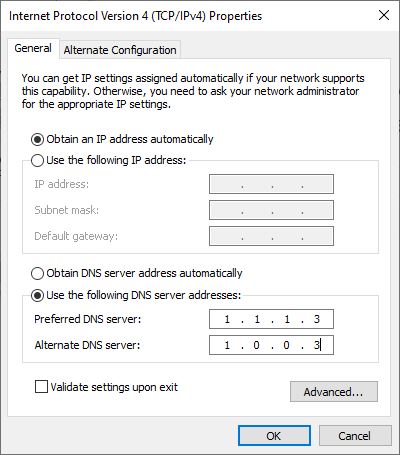
CloudFlare offers three options. For a no-frills one, use 1.1.1.1. To cut out malware as well, use 1.1.1.2 (and/or 1.0.0.2). To cut off malware and adult content, especially if you have kids at home, use 1.1.1.3 (and/or 1.0.0.3).
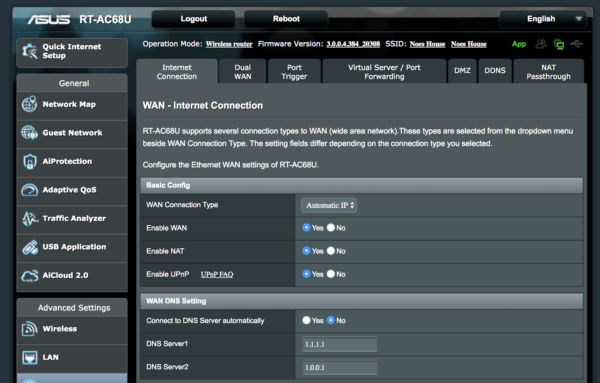
Where can you find these settings? If you want to change this in your router, which will switch everyone at home to the new DNS, go to your router settings.
They may differ, depending on the manufacturer. Here below is an example of a dashboard screen from an Asus router.
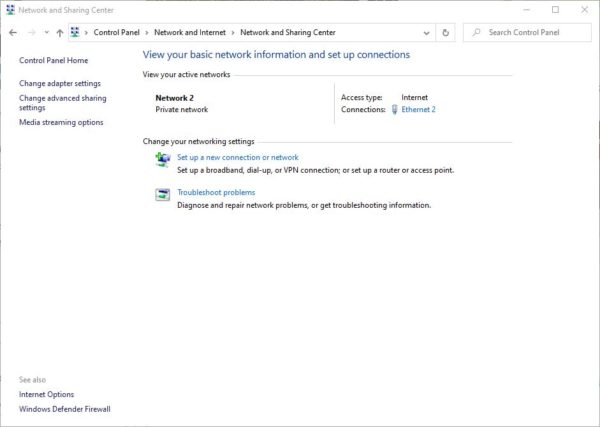
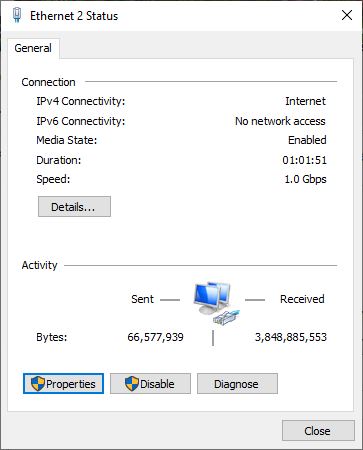
If you want to just change the DNS for your own Windows 10 PC, you can go to your network settings. Go to Control Panel > Network and Internet > View network status and tasks and click on the Wi-Fi or wired connection you are using.
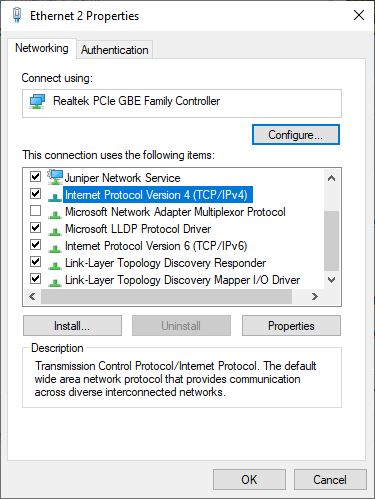
Then click on Properties on the pop-up window and select Internet Protocol Version 4 (TCP/IPv4). Then click on Properties. In the window that pops up, change the DNS settings at the bottom half.
Do be careful, of course, when changing DNS settings. Typing in the wrong address might end up messing up your connection as well.
There are also instances of DNS “poisoning”, where hackers will take control of computers to point people to fake sites to steal passwords and install malware, so make sure to secure your PC and router with strong passwords, as is the usual practice.
For more on DNS, read up on PC Mag’s great explanation here.
UPDATE at 17/04/2020, 10:40am: StarHub has apologised for the outage and said it will offer affected customers a one-time 20 per cent rebate on their Home Broadband monthly fee. A dedicated website will be made available for affected customers to register for the rebate. Details will be announced to customers later.
